
App Inventor: Skapa Android-app - en självstudie
I detta praktiska tips förklarar vi hur du skapar Android-appar med App Inventor. Följ denna handledning för att bygga appar på relativt kort tid.
Logga in på MIT App Inventor
Gå till App Inventor-webbplatsen och klicka på knappen "Skapa" i det övre högra hörnet.
- App Inventor kräver tillåtelse för att få åtkomst till ditt Google-konto. Bekräfta genom att klicka på "Tillåt".
- Efter den första inloggningen kan du delta i en undersökning. Om du inte vill ha detta, klicka på "Ta aldrig undersökning".
- Klicka sedan på "Fortsätt" till App Inventor-arbetsytan.

Skapa den första appen i App Inventor - layouten
- Klicka på knappen "Nytt projekt" i det övre vänstra hörnet. Ange projektnamnet och välj "Ok".
- Dra nu en "etikett" från "användargränssnittet" till vänster till skärmen som visas i mitten. Under "Egenskaper" kan du ändra "Text" för den markerade nyligen tillagda etiketten.
- Spara ditt projekt via "Projekt" och välj "Spara projekt".
- Du kan nu skjuta alla andra UI-element på skärmen. Annat medieinnehåll kan också läggas till via "Ritning och animering".
- Använd "Layout" för att ändra arrangemanget för dina element.
Logik över blocken - ett exempel
Om du vill skapa ytterligare skärmar för din app klickar du på "Lägg till skärm". Du kan sedan till exempel gå till den andra skärmen i din layout med hjälp av UI-elementet "Button". För att göra detta behöver du dock logik som körs i bakgrunden. I App-uppfinnaren bygger du dem med "Block".
- För att göra detta, klicka på "Blocks" bredvid "Designer" i det övre högra hörnet. Där går du till motsvarande skärm och klickar på knappen i vänster "Blocks" -skärm.
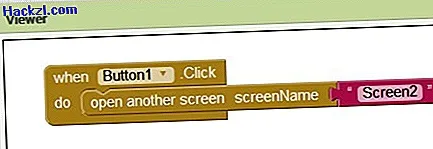
- Välj funktionalitet "när knappen1.Klicka på".
- Sätt nu in ett "Kontroll" -element i detta "Pussel" -element, nämligen "öppna en annan skärmnamn".
- Nu saknas bara skärmnamnet. För att göra detta klickar du på "Text" i blockskärmen och väljer det övre elementet, som består av endast två citattecken.
- Ange namnet på skärmen i detta textelement, i det här exemplet "Screen2".
Testa appen på din smartphone
Om du vill testa dina appar skapade i App Inventor direkt på din Android-smartphone följer du stegen nedan.
- Installera MIT App Inventor Companion App på din Android-smartphone.
- Kontrollera att din dator och Android-smarttelefon finns i samma WiFi-nätverk.
- Öppna appen på din smartphone och klicka på "Anslut" i den översta menyfältet på din PC och välj "AI Companion".
- Klicka på "skanna QR-kod" i appen på din smartphone och skanna QR-koden som visas på din PC. Alternativt anger du den 6-siffriga koden som visas i appens textfält och trycker på knappen "anslut med kod".
- Appen kan nu provas på din Smarpthone.
Testa appen med emulatorn
Om du inte har en smartphone tillgänglig kan du testa din app på emulatorn som är integrerad i App Inventor.
- Ladda ner och installera programvaran App Inventor.
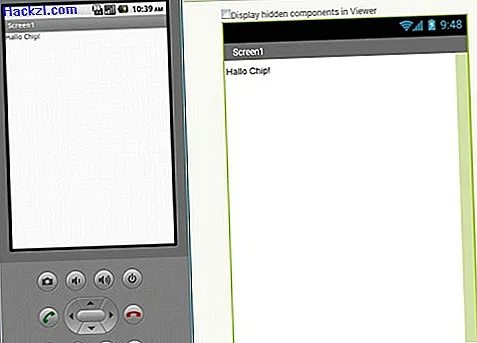
- Öppna nu det installerade programmet. En mobiltelefon skärm öppnas på din PC.
- Klicka nu på "Anslut" i menyraden för App-Inventor under ditt öppna projekt och välj "Emulator" där. Du kanske måste trycka på "Återställ anslutning" om du tidigare var ansluten till en smartphone.
- Applikationen visas nu i emulatorn.
- I vissa fall ser du ett felmeddelande. Companion-appen är därför inte längre aktuell. Klicka sedan på "OK" i fönstret som visas.
- Bekräfta uppdateringen i emulatorn med "OK" och "Installera". Slutligen klickar du på "Klar" på emulatorskärmen.
- Anslut igen via "Connect" -> "Reset Connection" och sedan "Connect" -> "Emulator".
När du har skapat din app kan du spara en .apk-fil för din app på din dator i menyraden via "Bygg". När du har publicerat appen på Google Play bör du också tänka på att marknadsföra din app.